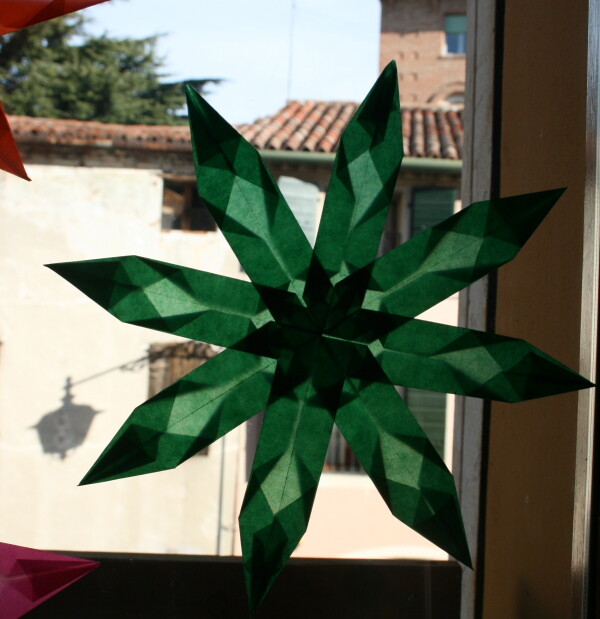
LAVORETTI PER NATALE – stella di carta trasparente – modello 6 – Tutorial per realizzare una stella di carta trasparente a otto punte con la tecnica del paperfolding (o piegatura della carta).
E’ un’attività che consiglio, da proporre ai bambini dai 6 anni in su. Oltre ad essere un esercizio importante per sostenere lo sviluppo di una sana coordinazione occhio-mano, ha elementi rilassanti e meditativi. In queste giornate di solstizio d’inverno e di attesa del Natale, queste stelle, applicate alle finestre di casa, portano meraviglia agli occhi dei bambini e ci fanno sentire tutta la bellezza della luce.
LAVORETTI PER NATALE – stella di carta trasparente – materiale occorrente
otto rettangoli di carta trasparente
colla da carta.
LAVORETTI PER NATALE – stella di carta trasparente – come si fa
Preparate otto rettangoli di carta colorata trasparente 10 cm x 5 cm.
Per ogni rettangolo procedete così: piegate a metà nel senso della lunghezza e riaprite,

Piegate i quattro angoli:

Per due dei triangoli di una estremità procedete così: riaprite

piegate un triangolino verso l’interno:


richiudete la piega iniziale:
Ora piegate i margini lunghi e poi riapriteli, così:


Poi, all’altra estremità, fate questa piegatura:


E infine richiudete seguendo la piegatura lunga:

Assemblate gli otto elementi con della colla da carta, sul rovescio:

Transparent paper star tutorial – model 6 – Tutorial to make an eight-pointed star with transparent paper with the technique of paperfolding.
It is an activity that I recommend, to be offered to children ages 6 and up. Besides being an important exercise to support the development of a healthy hand-eye coordination, it is an activity relaxing and meditative.
In these days of the winter solstice and waiting for Christmas, these stars, applied to the windows, bring wonder to the eyes of children and make us feel all the beauty of the light.
Transparent paper star tutorial – model 6
What do you need?
8 rectangles of transparent paper
glue
Transparent paper star tutorial – model 6
How is it done?
Prepare 8 rectangles of colored transparent paper; my rectangles measure 10 cm x 5 cm. Fold each of the rectangles, in the same way, as shown below.
First, fold the rectangle in half and open:
Fold the four corners:
For two of the triangles of one end, proceed as follows: reopen
fold a triangle towards the inside:
Close the initial fold:
Now fold the long edges and then reopen these as well:
Then, at the other end, make this folding:
And finally, following the close folding long:
When the eight elements are ready, assemble the star in this way: