

Scatola origami a forma di vaso da fiori: richiede molte piegature, ma ne vale la pena perchè il risultato è molto bello e la scatola risulta capiente e robusta. Non ha il coperchio.
Materiale occorrente: un foglio quadrato, di qualsiasi dimensione.

Come si fa
Piegate il foglio lungo la diagonale:


aprite:


piegate l’altra diagonale:


e aprite:


girate il foglio:


piegate a metà:


aprite; piegate l’altra metà:


tenendo l’ultima piega prendere in mano il foglio:


e, seguendo le pieghe fatte, richiuderlo così:


Posatelo sul tavolo e piegate la punta verso il basso:


girate e fate la stessa cosa sull’altra facciata:


piegate nuovamente la punta, così:


e poi ancora, così:


girate il lavoro:


e fate la stessa cosa sull’altra facciata:


prendete in mano il lavoro:


sfogliatelo in modo da mettere in vista le due “pagine” interne:


e posate sul tavolo. Piegate l’angolo inferiore verso l’alto, così:


girate e piegate nuovamente, così:


ripetete l’operazione sull’altra facciata:

piegate nuovamente, così:


prima su una facciata, poi sull’altra. Una volta fatto, prendete in mano il lavoro:


sollevate la piega che si trova in alto, così:


e piegate le punte laterali verso la piega che si trova al centro:


da entrambi i lati:


quindi ripiegate nuovamente la piega che avevate aperto:


girate il lavoro e ripetete sull’altra facciata:


aprite nuovamente la piega orizzontale in alto, tirate fuori gli angoli a destra e sinistra, e ripiegate nuovamente la piega orizzontale, così::


Aprite di nuovo la piega orizzontale, e piegate le punte che si trovano a destra e a sinistra, facendo in modo che la punta tocchi la linea centrale:


e richiudete nuovamente la piega orizzontale in alto:


girate e ripetete sull’altra facciata:


prendete in mano il lavoro:


e piegate sotto gli angolini che sporgono ai lati, su entrambe le facciate:


così:


posate sul tavolo, aprite di nuovo la piega orizzontale in alto:


e ripiegate la piccola parte sporgente, a forma di rettangolo, così:


poi, con molta pazienza, ripiegando la piega orizzontale in alto che avevamo aperto, facciamo in modo di inserire il rettangolino all’interno della fessura sottostante, così:


ripetiamo su entrambi i lati di entrambe le facciate:


posiamo sul tavolo


e pieghiamo la punta che si trova in basso, così:


apriamo l’ultima piega fatta:


e prendiamo in mano il lavoro. Le pieghe sono completate, ora si tratta solo di aprire e modellare assecondando le piegature della carta, così:


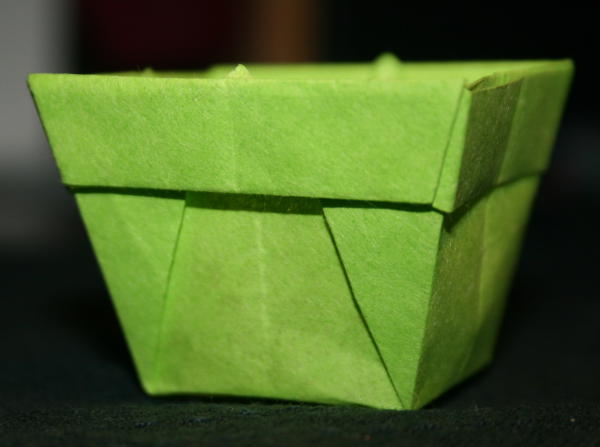
La scatola origami è pronta:


Origami box shaped flower pot, without lid: It requires a lot of folds, but it’s worth it because the result is very nice and the box is spacious and sturdy. It does not have the lid.
Origami box shaped flower pot, without lid
What do you need?
a square sheet of any size.
Origami box shaped flower pot, without lid
What to do?
Fold the sheet along the diagonal:
open:
fold the other diagonal:
and open:
turn it:
fold in half:
open; fold the other half:
holding the last fold take in hand the sheet:
and, following the folds made, close it so:
Put it on the table and fold the tip downward:
turn and do the same thing on the other side:
fold again the tip:
and then again:
turn the work:
and do the same thing on the other side:
take in hand the work:
browse it in order to place in view of the two internal “pages” :
and put it on the table. Fold the bottom corner upwards:
turn and fold again:
repeat the process on the other side:
fold again:
first on one side, then the other. Once done, take in hand the work:
raise the fold which is located at the top:
and fold the lateral tips to the fold that is at the center:
both sides:
then fold again the fold you had open:
turn the work and repeat on the other side:
open again the horizontal fold at the top, pull out the corners to the right and left, and folded again the horizontal fold:
Open again the horizontal fold, and fold the tips that are located left and right, making sure that the tip touches the center line:
and close again the horizontal fold at the top:
turn and repeat on the other side:
take in hand the work:
and fold under the corners which protrude at the sides, on both sides:
in this way:
put on the table, open again the horizontal fold at the top:
and folded the small protruding part, in the shape of rectangle:
then, very patiently, folding the horizontal fold at the top that we had opened, do so to insert the small rectangle within the slit underneath:
repeat on both sides of both facades:
put on the table:
and fold the tip which is located below:
open the last fold made:
and take in hand the work . The folds are completed, now it is just to open and shape favoring the folds of the paper:
the origami box is ready: